Garrattfan's Modelrailroading Pages
Photography
Lighting
Ligthing is the all important job of photography. If you have the lighting wrong you'll have a hard time creating a good picture. Good lighting is more than just engulf the scene in light. It needs some subtlety. But if you get it right, you've laid a firm foundation for a beautiful impression.
 |
No flash!! I rarely flash my photo's. Turn it off!! The flash usually kills the atmosphere. It is also very unpredictable. You can only see the result after the photo has been taken. Use the ambient lighting as much as possible. You don't need expensive equipment however to create your own lighting. I bought three halogen desk lamps at 5 euros each. You'll need two anyway to light your model when you're working on it. So for the pfoto's you only need to buy one extra. Simple and cheap. When you buy them make sure that the arm of the lamp can swing all the way to the desktop. Some lamps don't and you definitely need this freedom of movement. The lamp itself should be able to move in great angles. An extendible arm is nice but not really necessary |
Positioning the lights is a matter of common sense
 |
 |
Lamp 1 is used to give general lighting to light up the surrounding area. This lamp is not necessarily placed between the camera and the model. It can also be (and usually is) placed behind the model to provide background lighting. It also illuminates the shadows cast by the two main lights. Keep the light high in order to spread the light evenly.
The other two are used to give direct light on the model from two different angles. Using two lamp reduces hard shadows very much. The two are usually placed somewhere between the camera and the model. Position them so that one will give the main light and the other so that it will soften the shadows if of the first one. The closer you you position a lamp the harder and the stronger the light will be.
 |
Light 2 only. This ligth will provide the main light on the model and
is subsequently placed relatively high. Note the deep shadows on the right. |
 |
Ligth 3 only. This light is used as a fill-in for light 2 and placed
relatively low. This also avoids nasty reflections on the boiler. |
 |
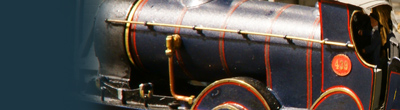
Lights 2 and 3. This looks more like it. |
 |
All lights on. The background is lit a little better and right side of the model, furthest away form the camera, receives a little more light. This photo is not going to make it to Model Railroader's front page, it will do to demonstrate the idea of working with three lamps. |
Pay close attention to reflections on the model. Sometimes reflections may contribute to the quality and atmosphere of a photo but use this effect with care. Working woth lamp instead of flash light makes lighting very controllable. It is easy to avoid weird reflections by simply turning the light a little or moving it a little to the left or the right.
 |
Lamp 3 in high position, giving a hard reflection on the boiler |
 |
Lamp 3 in low postion. The reflection is gone but now the water tanks are highlighted. Neither photo is completely right or wrong. For one it is always a trade off between possibilities and second it is also a matter of taste. |

Sign my
GuestBook